


Tkinter GUI Framework- Most Used Graphical User Interface
“Tkinter-Most used GUI framework in Python”.
Python provided many options for developing the GUI. And all of GUI methods, Tkinter is the most common method uses in Python. This is a standard Python interface. Python with Tkinter GUI outputs the fast and simple way to develop the GUI application. It is developing a GUI using Tkinter is a simple task.
Suggested Blog:- Java GUI Framework and Other Applications Of Java.
Let’s have a brief about Tkinter GUI-
Table of Contents
What is Tkinter?
Tkinter provides a basic concept of Python. Tkinter GUI framework is built for beginners and professionals. Python provides a standard library Tkinter for developing the GUI for desktop-based applications. And developing a desktop-based application with Tkinter GUI is not a difficult task. It is an easy task for developing Python GUI Tkinter applications. Tkinter is developing a top-level window that can be made by using the following task.
Suggested Blog:- Django Tutorial For Beginners [Best Guide Django Documentation].
- import Tkinter module.
- Develop the main application window.
- Add the widgets as labels, buttons, frames, etc. To a window.
- Call the main event loop so it is the actions it can take location on the user’s computer screen.
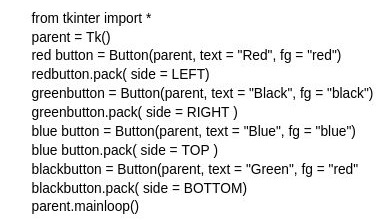
| from Tkinter import * #develop the main window top = Tk() #Enter the main loop event top.mainloop() |
OutPut
Why Use Tkinter in python?
Tkinter is the same old GUI library for python. When python blended with Tkinter then it gives a fast and easy system for creating GUI programs. Tkinter offers a robust object-oriented interface for the TK GUI toolkit. Tkinter is the best GUI platform for making GUI based applications in Python. So that’s why Tkinter use in Python programming language.
Python tells many types of methods to develop GUI. The most commonly used tkinter is the python interface considered for the tk GUI toolkit shipped with python.
Suggested Blog:- Data Science With Python Tutorial For Beginners And Professional.
Advantages of The Tkinter GUI
It is easy and fast as compared to other GUI, tkinter should contain only python and no need to download anything. It provides simple syntax which is easy to read, write.
Layered method:
The layered technique utilized in designing and Tkinter presents all the benefits of the TK library. Therefore, at the time of making, Tkinter inherited from the advantages of a GUI toolkit that had been supplied time for mature. Moreover, the conversion from Tcl and TK for Tkinter is certainly trivial, so that TK programmers can research from use Tkinter very easily. The layered method is reliable and stable compared to rewriting the starting version of tkinter back from scratch.
Accessibility:
Learning Tkinter is very natural, and therefore fast and painless. The Tkinter implementation hides the unique and complex calls in simple, intuitive methods. This is a continuation of the Python manner of thinking for the reason that language excels at quickly building prototypes. It is therefore predicted that its preferred GUI library be applied the usage of the same technique. For example, right here is the code for a typical “Hello world”-like application:
Suggested Blog:- NLP Tutorial [History, Working, Implements, Components, Libreries].
from Tkinter import *
root = Tk( )
root.Title(“A simple application”)
root.Mainloop( )
The first 2 lines permit developing a whole window. Compared to MFC programming, it makes no question that Tkinter is easy to use. The third line sets the caption of the window, and the fourth one makes it input its event loop.
Portability:
Python scripts that use Tkinter do now not require modifications to be ported from one platform to the other. Tkinter is to be had for any platform that Python is carried out for, particularly Microsoft Windows, X Windows, and Macintosh. This gives it an excellent benefit over maximum competing libraries, which are often restricted to at least one or platforms. Moreover, Tkinter will offer the local look-and-sense of the particular platform it runs on.
Availability:
Tkinter is now included in any Python distribution. Therefore, no supplementary modules are required so one can run scripts the use of Tkinter.
Suggested Blog:- Procedural Programming Language Which Uses C, PASCAL, FORTRAN.
Tkinter Geometry
This is a python module that uses to develop GUI. This comes with Python So do not have to install but we can use pip command. Tkinter GUI framework provides different methods and one of them is the geometry() method. It uses to set off the dimensions of the Tkinter window also this uses to set portions of the window on the desktop.
Tkinter GUI frameworks geometry specifies the method by using that widgets are represented on display. And it gives the following methods.
- A pack() method
- A grid() method
- A place() method
So let’s discuss these methods.
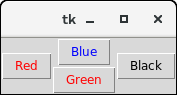
Tkinter Pack() Method
By using pack tinter we can do user interface design very fast. It is most commonly used. It accesses a fair amount of flexibility. The pack() widget is used to organize in the block. And the positions widgets added to the python application using the pack() method can be handled by using the different choices specified in the methods cell. And the syntax uses the pack() given below.
widget.pack(options)
A-List of possible choices it can be passed in the pack() is given below.
| Expand | If this is set to true, the widget expands to fill any space. |
| Fill | By default, the fill is set to NONE. However, we can set it to X and Y to determine whether the widgets contain any extra space. |
| Size | This represents the side of the parent to which the widget is to be located at the window. |
Example.
OutPut
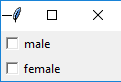
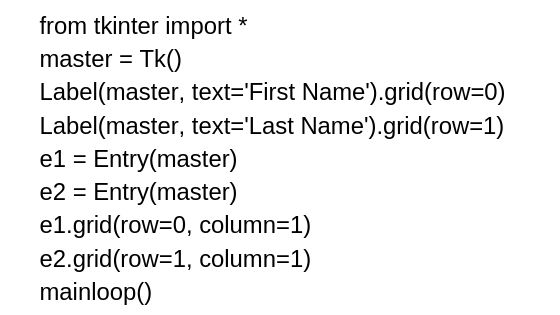
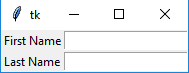
Tkinter Grid() Method
It is used to create complex layouts. It also allows the user to actually split columns and rows. A lot of nested frames need to be used to get the pack method right.
Its geometry manager organizes widgets in a table-like structure in the Janak widget. Se here is a syntax given below.
widget.grid( grid_options )
| Column | It is represented by Zero. The column number in which the widget is to be located. |
| Column-span | It is the width of the widget. This represents the number of columns up to which, the column is expanded. |
| Ipadx, Ipady | This represents a number of pixels to pad the widget inside the widget’s border. |
| Padx, Pady | This represents a number of pixels to pad the widget outside the widget’s border. |
| Row | The row number in which the widget is to be placed. The topmost row is represented by 0. |
| Row Span | The height of the widget the number of the row up to which the widget is expanded. |
| Sticky | If the cell is more than a widget, then sticky is used to specify the stand of the widget inside the cell. That may be the concatenation of the sticky letters representing the stand of the widget. This may be N, E, W, S, NE, NW, NS, EW, ES. |
Example.
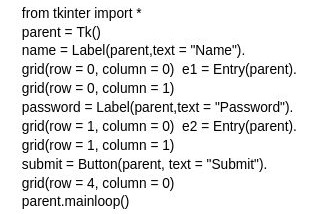
OutPut
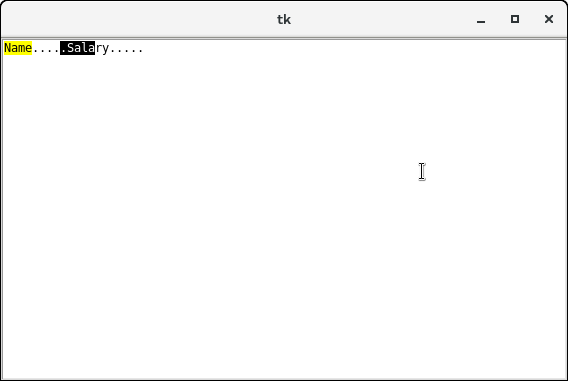
Tkinter place() method
This is the most powerful method as it allows the placement of extracts inside the master content. It is very difficult to use and allows the placement of widgets using the shape of the master window. The same principle applies for widget size. The place() geometry manager organizations the widgets to the specific X and Y coordinates. The syntax is given below.
widget.place(options)
| Anchor | The anchor represents the exact position of the widget inside the container. And the default value is NW upper left corner. |
| Border Mode | It is the default value of the border and type is WITHIN which refers to ignore the parent’s inside the border. The other choice is OUTSIDE. |
| Height, Width | This is referred to as the height and width in pixels. |
| Relheight, Relwidth | This is represented as the float between 0.0 and 1.0 indicating the fraction of the parent’s height and width. |
| Relx, Rely | This is represented as the float between 0.0 and 1.0 this is the offset in the horizontal and vertical way. |
| X, Y | that refers to horizontal and vertical offset in the pixels. |
Example.
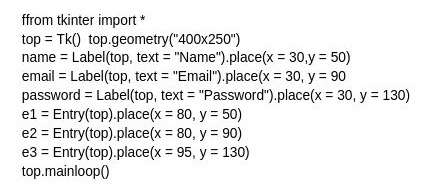
OutPut
Tkinter Widgets
Here are many widgets. Which used to develop PythonGUI applications.
| S.N | Widget | Description |
| 1 | Button | It is used to add many kinds of a button to the python application. |
| 2 | Canvas | This widget is used to pull the canvas on the window. |
| 3 | Checkbutton | It is utilized to display the CheckButton at the window. |
| 4 | Entry | An entry widget is used to display the single-line text field to the user. This is normally used to accept user values. |
| 5 | Frame | The frame can be defined as a container to which, another widget can be added and organized. |
| 6 | Label | That is a text uses to display a few messages about the other widgets. |
| 7 | ListBox | A list box widget is used to display a list of options to the user. |
| 8 | Menu Button | A menu button is used to display the menu items to the user. |
| 9 | Menu | The menu is used to add menu items to the user. |
| 10 | Message | A widget is used to display the message box to the user. |
| 11 | Radiobutton | Radio Button is different from a check button. |
| 12 | Scale | The scale is used to give the slider to the user. |
| 13 | Scrollbar | Scrollbar gives the scrollbar to the user so the user can scroll the window up and down. |
| 14 | Text | That is various from Entry because this gives a multi-line text field to the user so the user can write the text and edit the text within it. |
| 15 | Toplevel | Toplevel used to develop a separate window container. |
| 16 | Spinbox | Spinbox is an entry widget which used to select from options of values. |
| 17 | Paned Window | This is like a container widget that contains horizontal or vertical panes. |
| 18 | Label | This is a container widget that works as a container. |
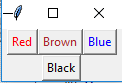
1. Tkinter Button
The button uses to add your application, and this uses the general syntax.
W=Button(master, option=value)
Master is a parameter for uses to represent the parent window. And there are a number of choices that are uses to change the format of a button. So we can pass the number of options as a parameter and separated with commas. Here is given below.
- activebackground: In this button, we set the background color when the button is under the cursor.
- activeforeground: In this button, we set the foreground color when the button is under the cursor.
- bg: It button to set the normal background color.
- command: This uses to call a function.
- font: This uses to set the font on the button level.
- image: The set image on the button.
- width: Set the width of the button.
- height: Set the height of the button.
Example:

Output
2. Tkinter Canvas
Canvas is used to draw an image and other difficult layouts like graphics, text, and widgets. The syntax is here.
w = Canvas(master, option=value)
Master is the parameter. And that is used for representing the parent window. Here are a number of choices that used to change the format of the widget. You can pass the number of options as parameters separated with commas. Some of here.
- bd: Set the border width in pixels.
- bg: Set the normal background color.
- cursor: Set the cursor used in canvas
- highlightcolor: Set the color shown in the focus highlight.
- width: Set the width of the widget.
- height: Set the height of the widget.
Example.
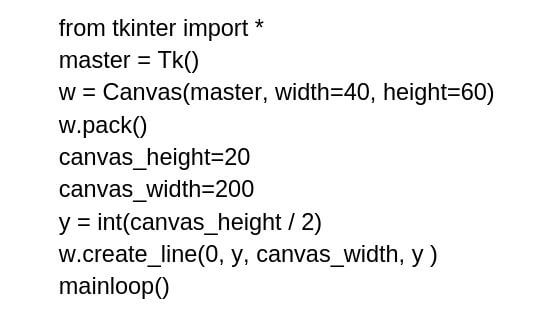
OutPut
3. Tkinter Checkbutton
Choose any number of options by displaying several choices to a user as toggle buttons. The syntax is here.
w = CheckButton(master, option=value)
We use this button for checking data or information.
- Title: For set the title of the widget.
- activebackground: For set the background color when the widget is under the cursor.
- activeforeground: For set the foreground color when the widget is under the cursor.
- bg: For set the normal background Steganography
- Break
- Secret Code:
- Attach a File: Nd color.
- command: For call a function.
- font: For set the font on the button label.
- image: For set the image on the widget.
Example.
OutPut
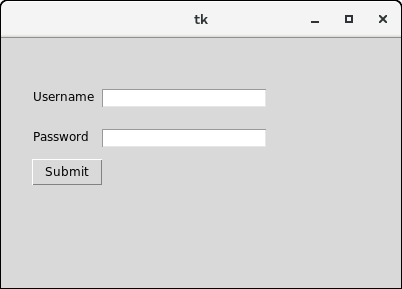
4. Tkinter Entry
This is used for input the single-line text entry from the user. To multi-line text input, a Text widget is used. The syntax is here:
w=Entry(master, option=value)
- bd: For set the border width in pixels.
- bg: For set the normal background color.
- cursor: For set the cursor used.
- command: For call a function.
- highlightcolor: Forset the color shown in the focus highlight.
- width: For set the width of the button.
- height: For set the height of the button.
Example.
OutPut
5. Tkinter Frame
The frame can be defined as a container to which, another widget can be added and organized. This is used for grouping and organizing the widgets. The syntax is here:
w = Frame(master, option=value)
- highlightcolor: For set the color of the focus highlight when the widget has to be focused.
- bd: For set the border width in pixels.
- bg: For set the normal background color.
- cursor: For set the cursor used.
- width: For set the width of the widget.
- height: For set the height of the widget.
Example.
OutPut
6. Tkinter Label
This refers to the display box. Lable put any text or image and we can update any time but we need as per the code. The syntax is here.
w=Label(master, option=value)
- bg: For set the normal background color.
- command: For call a function.
- font: For set the font on the button label.
- image: For set the image on the button.
- width: For set the width of the button.
- height” For set the height of the button.
Example.
OutPut
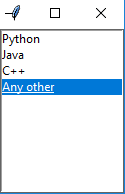
7. Tkinter ListBox
A list box widget is used for display the list item for the user. We can locate only text items in the list box and all text items contain the same font and color. And the user can select more items from the list depending on the configuration. The syntax is given below.
w = Listbox(parent, options)
- Highlightcolor: For set the color of the focus highlight when the widget has to be focused.
- bg: For set the normal background color.
- bd: For set the border width in pixels.
- font: For set the font on the button label.
- image: For set the image on the widget.
- width: For set the width of the widget.
- height: For set the height of the widget.
Example.
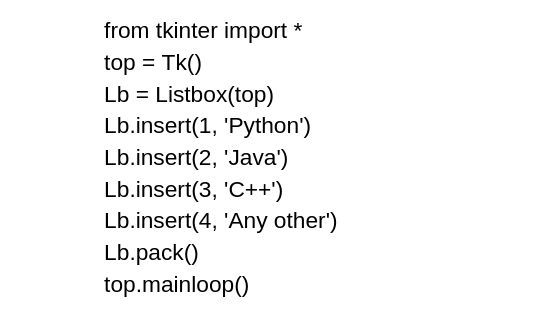
OutPut
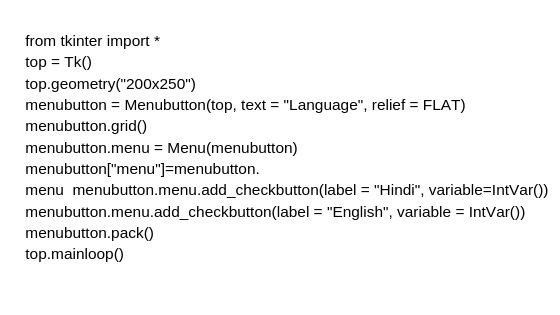
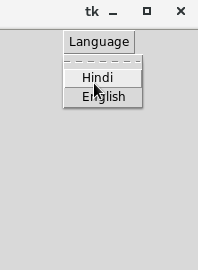
8. Tkinter MenuButton
This is used to give the user a choice to choose the appropriate choice that exists inside the application. The Menubutton is used to implement different types of menus in the python application. A Menu links with the Menubutton which can display the options of the Menubutton when clicked by the user. The syntax is here.
w = Menubutton(Top, options)
- activebackground: For set the background when the mouse is over the widget.
- activeforeground: For set the foreground when the mouse is over the widget.
- bg: For set the normal background color.
- bd: For set the size of the border around the indicator.
- cursor: For appear the cursor when the mouse over the menubutton.
- image: For set the image on the widget.
- width: For set the width of the widget.
- height: For set the height of the widget.
- highlightcolor: For set the color of the focus highlight when a widget has to be focused.
Example.
OutPut
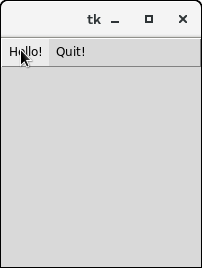
9. Tkinter Menu
Menu widget uses to develop diffrent types of menus like top-level, pull-down and pop-up in the python application. The syntax is here.
w = Menu(top, options)
- title: For set the title of the widget.
- activebackground: For set the background color when the widget is under the cursor.
- activeforeground: For set the foreground color when the widget is under the cursor.
- bg: For set the normal background color.
- command: For call a function.
- font: For set the font on the button label.
- image: For set the image on the widget.
Example.

OutPut
10. Tkinter Message
This widget is used for show the message to the user regarding the behavior of the python. And a message widget shows the text messages to the user that can not be edited. And text contains more than one line. So a message can only be displays in a single font. The syntax is here.
w = Message(parent, options)
A list of possible choices is given below.
- bd: For set the border around the indicator.
- bg: To set the normal background color.
- font: For set the font on the button label.
- image: For set the image on the widget.
- width: For set the width of the widget.
- height: For set the height of the widget.
Example.
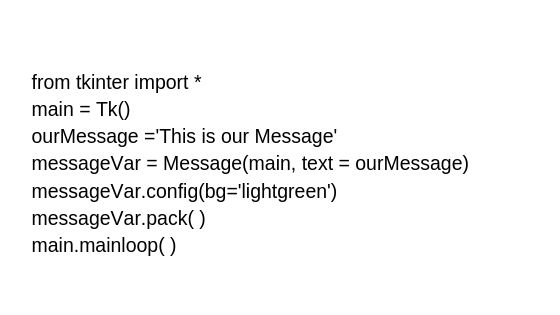
OutPut
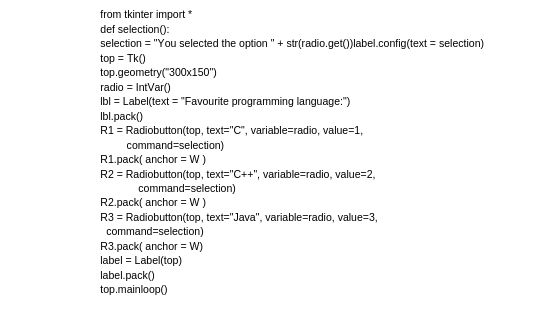
11. Tkinter Radiobutton
This button uses for implement one of many selections in python. That shows the multiple options to the user out of which, a user can select only one out of them. So we can add various ways by each of the radiobutton. And we can display the multiple-line text or pictures on the radiobuttons. For hold track the user’s selection the radiobutton, so this is the add by a single variable. Every button displays a single value for that particular variable. The syntax is here.
w = Radiobutton(top, options)
A list of possible choices is given below.
- activebackground: For set the background color when the widget is under the cursor.
- activeforeground: For set the foreground color when the widget is under the cursor.
- bg: To set the normal background color.
- command: For call a function.
- font: For set the font on the button label.
- image: For set the image on the widget.
- width: For set the width of the label in characters.
- height: For set the height of the label in characters.
Example.
OutPut
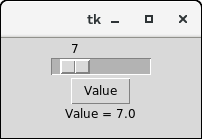
12. Tkinter Scale
The scale widget uses for implement the graphical slider for the python so that the user can slide by the range of values shown on the slider and choose the one among them. We can handle the minimum and maximum values along with the resolution of the scale. This gives an alternative to the entry widget when the user is force to choose just one value to provide a range of values. The syntax is here.
w= Scale(top, options)
A list of possible choices is given below.
- activebackground: For set the background color when the widget is under the cursor.
- activeforeground: For set the foreground color when the widget is under the cursor.
- bg: A background color of the widget.
- command: For call a function.
- font: For set the font on the button label.
- image: For set the image on the widget.
- width: For set the width of the label in characters.
- height: For set the height of the label in characters.
Example.

OutPut
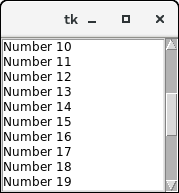
13. Tkinter Scrollbar
The scrollbar widget uses for scroll down the content of the other widget like a list box, text, and canvas. We can also make the horizontal scrollbars to the entry widget. The syntax is here.
w=Scrollbar(top,options)
A list of possible choices is given below.
- width: For set the width of the widget.
- activebackground: For set the background when the mouse is over the widget.
- bg: A background color of the widget.
- bd: For set the size of the border around the indicator.
- cursor: For appear the cursor when the mouse over the menubutton.
Example.
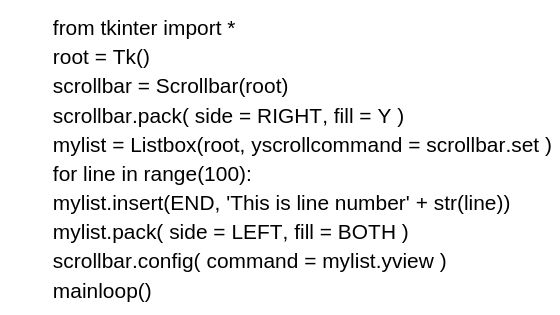
OutPut
14. Tkinter Text
The text widget uses for the show text information on the python. Tkinter gives us the entry widget that uses for implement the single-line text box. And this uses for display the multiline format text by the different styles and attributes. The text widget is most uses to provide the text and editor to the user.
The Text widget also benefits us to use the marks and tabs to place the specific sections of the Text. We can also use the windows and images with the Text as that can also be used for display the formatted text. The syntax is here.
w = Text(top, options)
- highlightcolor: For set the color of the focus highlight when a widget has to be focused.
- insertbackground: This represents the color of the insertion cursor.
- bg: A background color of the widget.
- font: For set the font on the button label.
- image: For set the image on the widget.
- width: For set the width of the widget.
- height: For set the height of the widget.
Example.
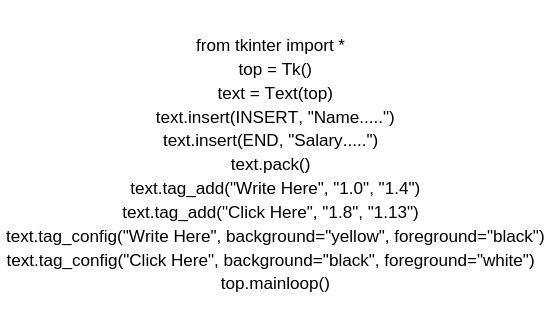
OutPut
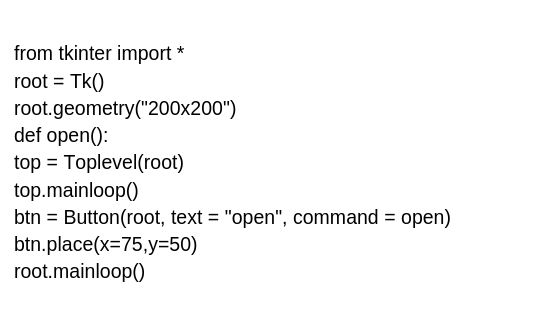
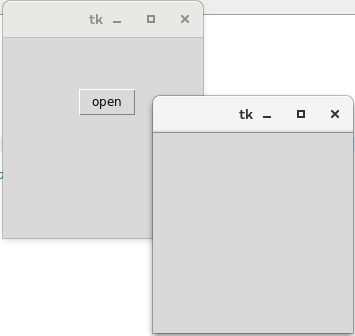
15. Tkinter Toplevel
This widget uses for the make and display of the top-level window this is directly controle with the window manager. A top-level widget may not have the parent window on the top of them. And this widget uses when a python application requires to represent a few data, pop-up, and the group of the widget on the new window. And this window has the title bar, border, and other window decoration. The syntax is here.
w = Toplevel(options)
- bg: It represents the background color of the window.
- bd: It represents the border size of the window.
- cursor: The mouse pointer changes to the cursor type set to the arrow, dot, etc. when the mouse is in the window.
- class_ The text select in the text widget is an exporter to be choose to the window manager. We can set this to 0 to make this behavior false.
- font: A font type of the text inserted into the widget.
- FG: A foreground color of the widget.
- height: This represents the height of the window.
- relief: This represents the type of the window.
- width: This represents the width of the window
Example.
OutPut
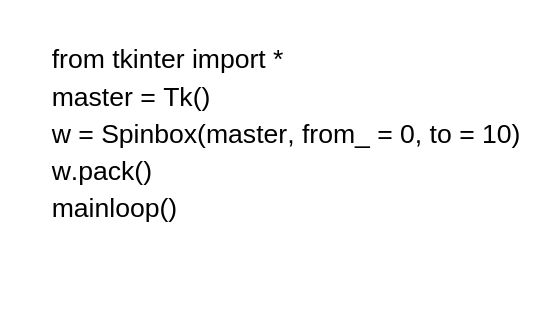
16. Tkinter Spinbox
Spinbox widget is an alternative for the Entry widget. This gives the range of values for the user, out of that, the user can choose only one. And we can use different options with the spin box to decorate the widget. The syntax is here.
w = Spinbox(top, options)
- bg: Set the background color of the widget.
- bd: For set the size of the border around the indicator.
- cursor: For appear the cursor when the mouse over the menubutton.
- command: For call a function.
- width: For set the width of the widget.
- activebackground: For set the background when the mouse is over the widget.
- disabledbackground: For disable the background when the mouse is over the widget.
- from_: For set the value of one end of the range.
- to: For set the value of the other end of the range.
Example.
OutPut
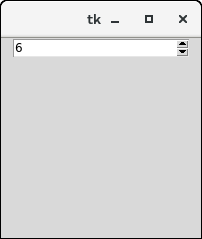
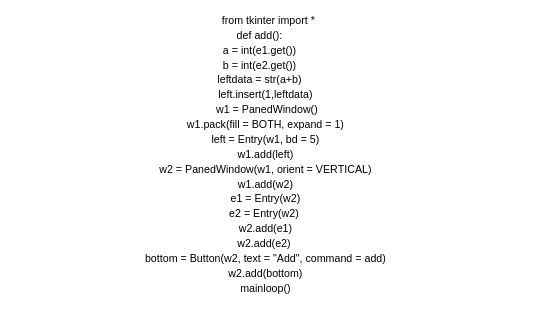
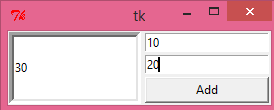
17. Tkinter PanedWindow
It widget acts like a container widget that contains more Childs widget manages the horizontally. The child pans can be resized by the user, with moving the separator lines known as sashes using the mouse. Every pane contains only one widget. And this uses for various layout in the python application. The syntax is here.
w= PanedWindow(master, options)
- bg: This represents the background color of the widget when it does not have the focus.
- bd: For set the size of the border around the indicator.
- cursor: For appear the cursor when the mouse over the menubutton.
- width: For set the width of the widget.
- height: For set the height of the widget.
Example.
OutPut
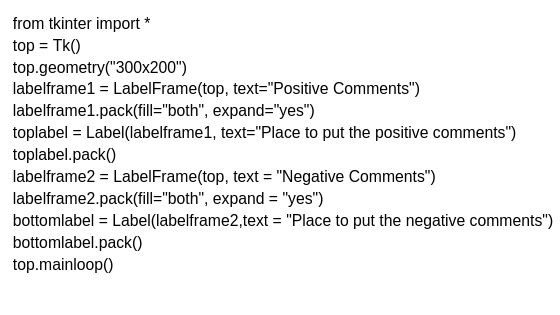
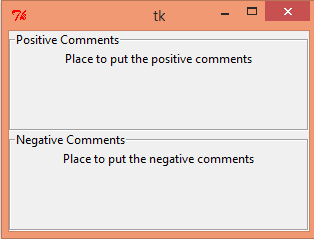
18. Tkinter LabelFrame
This uses for drawing a border around child widgets. We can display the title of the widget. Its widget is a variant of the Frame widget which has all the characteristics of a frame. This is also can display a label. The syntax is here.
w = LabelFrame(top, options)
- bg: Set the background color of the widget.
- bd: This represents the size of the border shown around the indicator.
- cursor: It can be fixes to a cursor type.
- font: This represents the font type of the widget text.
- height: This represents the height of the widget.
- width: Specifies the wanted width for the window.
- text: This represents the string containing the label text.
- highlight color: The color of the focus highlight when the widget has the focus.
Example.
OutPut
Conclusion
In this article, tkinter gui framework has been told, which is very useful for small tkinter, fast and powerful gui application. It runs on all platforms. Its accessibility and portability is very strong. Geometry is used inside it which is used to create the design and some widgets like buttons, menus, checkboxes, labels etc. is used which helps to make our ui nice and explain it well.

![Best Programming Language of 2018 [Most Popular]](https://techsore.com/wp-content/uploads/2018/12/Best-Programming-Language-Of-2018-Most-Popular-305x207.jpg)
![Best Python GUI Framework|Toolkits 2020 [Ultimate Guide]](https://techsore.com/wp-content/uploads/2019/06/www.techsore.com-2-305x207.jpg)